
Getting initiated into the fascinating world of cryptocurrency, specifically Bitcoin, involves running a Bitcoin node. Choosing the right Linux environment is crucial to this process. Debian, with its status as a stable, secure, and user-friendly distribution of Linux, is often the go-to choice for Bitcoin enthusiasts.
In this tutorial, we will explore how to install and configure a Bitcoin node on Debian Linux. We will begin with a basic installation and gradually unpack steps to enhance features, configure the bitcoin.conf file, and much more. This tutorial is perfect for complete beginners, offering explanations for each step in detail. Let’s get started.
Why Run a Bitcoin Node?
Running a Bitcoin node allows you to participate in the Bitcoin network. You can help validate and relay transactions, keep the network decentralized, contribute to the overall security, and have a sense of personal ownership in the ever-evolving Bitcoin ecosystem.
Key Requirements
Before diving into the installation process, you need to ensure that your Debian system meets the minimum requirements of:
- Bandwidth: Around 200 GB per month
- Storage: More than 800 GB Disk Space
- Memory: At least 2 GB RAM
These are just basic requirements. Do note that a faster internet connection, more storage, and greater memory will enhance the performance of your node.
To follow this tutorial, note that commands prefixed with a # are to be executed with root privileges. You can achieve this by logging in as the root user or by preceding the command with sudo. On the other hand, commands starting with a $ are meant for a regular user and don’t require special permissions. Remember to exclude the # or $ when you type out the command in the terminal.
Step-by-Step Basic Installation of Bitcoin Node
Step 1: System Update
First things first, you need to make sure your system is up-to-date. To do this, use the following commands:
# apt update
# apt upgrade -y
Step 2: Install Dependencies
Next, we need to install certain dependencies required for running a Bitcoin node:
# apt install git autoconf libtool libboost-dev libboost-all-dev g++ make pkg-config
Step 3: Download and Install Bitcoin Source Code
We will now download the Bitcoin source code from the official GitHub repository.
Go to the following URL:
https://github.com/bitcoin/bitcoin/tags
Find the latest version of the Bitcoin source code (At the time of this writing, it’s v24.2) and make note of the version number.
Now, clone the Bitcoin repository and checkout the version you had selected:
$ git clone https://github.com/bitcoin/bitcoin.git
$ cd bitcoin
$ git checkout tags/v24.2
Step 4: Compile and Install
After downloading the source code, it’s time to compile and install it.
$ ./autogen.sh
$ ./configure
$ make
# make install
Step 5: Run Bitcoin Node
Finally, we can now start our Bitcoin node. The ‘-daemon’ option implies that our Bitcoin node will run in the background as a daemon.
$ bitcoind -daemon
To check the status of your Bitcoin node synchronization, execute the following command:
$ bitcoin-cli -getinfo
Note: The initial blockchain synchronization(“sync”) process is resource-intensive and could take several hours to several days to complete, depending upon your hardware capabilities and internet connection.
To check the disk space used by your Bitcoin node, execute the command:
$ du -sh ~/.bitcoin/
This command will provide you with the total size of the .bitcoin directory, which is the default directory where the Bitcoin node stores its data, in a human-readable summary format. Remember to run this command as a regular user.
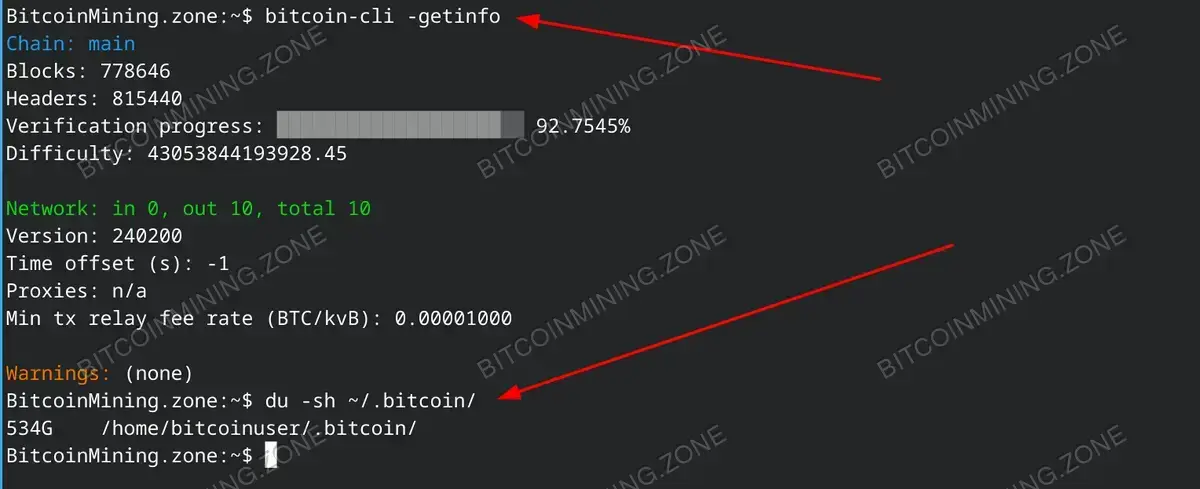
Assess the synchronization progress and disk space utilization of your Bitcoin node to ensure optimal performance.
Configuring Your Bitcoin.conf
Bitcoin allows users to configure their node by creating the bitcoin.conf file. This file will allow you to specify the network, transaction fees, connection settings, and much more. We will discuss that some other time. For now just play with this basic Bitcoin node installation.
FAQ:
1. What are the minimum requirements to run a Bitcoin node?
The minimum requirement to run a Bitcoin node include around 200GB per month of bandwidth, more than 800GB of storage and at least 2GB RAM.
2. How long does the initial blockchain synchronization process take?
The initial sync process can take several hours to several days, depending on your internet connection speed and hardware capabilities.
3. I’m not tech savy? Can I still setup my own Bitcoin node?
Absolutely. With this comprehensive guide, anyone can setup their own Bitcoin node, even if you are just starting out in the world of cryptocurrencies.